
Download the pdf document here:
Direct link
Mirror
If you have any questions or comments, feel free to leave a message!
Building and Animating
Texture-based
Facial Features for Maya and
Unity
Jacob Hemphill
August
2013
OVERVIEW
Goal:
To build a texture-based facial feature system that can be viewed and animated in Maya and be exported to the Unity engine.
To build a texture-based facial feature system that can be viewed and animated in Maya and be exported to the Unity engine.
In this document, I outline a new method for texture-based
animation in Unity. The process starts
in Maya, where the user builds a system to handle texture-based animation
through Maya expressions. That same
system controls joints which are exported for Unity. I wrote a C# script to handle the information
coming in on the joints, and display an identical animation in Unity.
Problem:
In Maya, it is not difficult to create a character with
animatable texture-based facial features, if that model is only handled in
Maya. The problem comes when exporting
that character to a game engine, as the engine may not support the same
features Maya offers.
Several common methods used in Maya cannot be used in Unity. An easy method is through texture swapping with a sequence of images; however, this is a large waste of resources in a game engine. We could also animate the UV maps in Maya, but Unity does not support that form of animation, since it only really takes joint animation, and not channel or vertex animation. A method we can use is through basic texture tiling and offset. Rather than animate the UV map above the texture, this method will offset the texture under the UV map to change the image.
This document is presented in the style of a tutorial that breaks down each step; you can read with the pictures or follow along with your own project. This writeup assumes an understanding of Maya modeling and texturing tools; an image editing software, such as Photoshop; a simple understanding of scripting (for editing and adaptation); and a very basic understanding of Unity.
BREAKDOWN
I. SETTING UP YOUR OBJECT FOR FACIAL PLANES
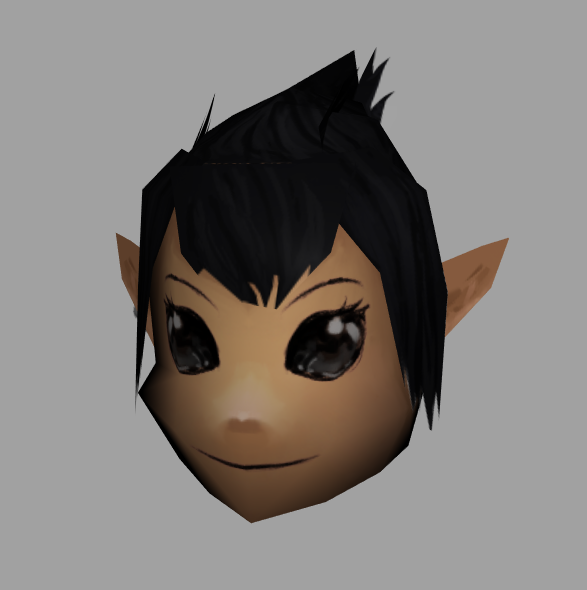
To begin, model or find the object that you wish to create the face. While this tutorial focuses around using it
for facial features, this method can be used to do any sort of texture-based
animation. For this example, I will be
using this low-poly model of Nassa, the Gnome:

Next step is to select the faces where you want the facial textures to exist. You can use as many or as few planes as you want, if you wanted to separate the eyes and brows, for example. Duplicate out these faces, and bring them slightly in front of the main geometry. By using the existing geometry (or cutting it from existing geo), it will be easier to construct something that is flush with the model.

For this low poly model, I added in some dummy planes
to get an idea of where her features would be.
Next, go to the UV window and arrage your UVs to fill the
space efficiently. (You can duplicate
your mirrored planes to share the same UV space.) I projected from the front camera, then
relaxed select UVs, since I want the frontal view to match the drawings for the
face. Choose your aspect ratio and save
your UVs out to file. For this model,
64x64 or 128x128 will be plenty.

Create in your facial features in Photoshop. I started with test features, and tweaked them to fit where I wanted them to go. The dummy planes from before helped me line up the facial features in Maya. You will also want to set up the alpha for your features in Photoshop.


Put your facial features on your object by creating a new material for each of the planes. Put the material file into your color and transparency.

Use the Hypershade to pipe in the same file and place2dTexture nodes for both diffuse and transparency. It will make section 4 simpler if they share the same nodes. I also applied the character's materials during this step.
You might have a flat color behind your facial features,
even though we set up alpha in Photoshop.
If that’s the case, make sure you also put your Diffuse texture into the
Transparency channel. A TIFF file works
great for 32-bit images, supporting alpha.


If you still have transparency issues, there are a couple of
things to check. Using High Quality
viewport or Viewport 2.0 (Maya 2014) may solve this. Also, if you are sharing transparent textures
with your base mesh texture, it may cause isses. Separate faces using transparency into a
different material. You may need to do
this in Unity as well.
Reference on alpha maps for Unity:
http://docs.unity3d.com/Documentation/Manual/HOWTO-alphamaps.html
II. BRING THE OBJECT INTO UNITY
Export your object as an FBX. When we import the file, Unity will set up
some of the folders for us.

Import object into Unity by dragging your FBX file from
Windows Explorer into your Unity project.
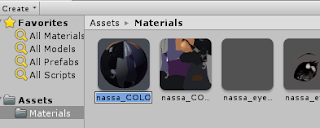
Unity will automatically create a Materials folder with your object's
texture information, but FBX files don’t carry the textures themselves.


Drag your character from the Project Assets into the Unity viewport. This will create an object in the scene for
us to test on.


Drag your texture files into your folder structure, then
assign them to the materials by selecting the material, then dragging the
texture there. For the sake of
simplicity, we will just keep the textures in the materials folder.


Now link your materials with the correct textures. For the sake of this example, I will just use diffuse shaders. My main shader is the default diffuse, and all of my shaders with alpha will get the Transparent/Diffuse shader.


But what about your other eye? When Unity imports an FBX, it creates materials based on the texture names, but items with shared textures don't get individual materials. In this case, it's okay that there is only one material, as it will be instanced in each of the eye objects. If you do need more materials, you can just create new nodes in your Project browser.

I also made a separate material for my meshes using transparency, just like we did in Maya.
Now's a good time to rename your textures as well, as Unity only
takes the diffuse filename for the texture.
Press F2 in Windows to rename a material.

Reference on transparency shaders for Unity: http://docs.unity3d.com/Documentation/Components/shader-TransparentFamily.html
All of these files will now show up in your Unity project
folder. Every time you update your
textures or export your FBX model, make sure you copy the new files into your
Unity project folder on your computer, and they will automatically update in
Unity.
If your model looks fine and transparency is working, it's
time to go back to Maya!

III. SETTING UP THE MULTI-FRAME TEXTURE
Now that it is working with one set of facial features, we
need to set up the rest of the frames.
First, decide on the number of permutations of each
feature. The nice thing about this
system is that you'll be able to add more later if you need to do so. Extend your texture size to accommodate that
number of frames, but make sure you keep the dimensions to a power of two. I went ahead and made colored boxes so I
could see the even separation of each square, and I overlayed the UVs over
them.

In this example, I have 8 eyes and 5 mouths. For both of these numbers, I’ll use 8 boxes. I'm leaving the colored boxes for now, and
later, I'll fill in the background with the correct color.


With the mouths, I had several unused boxes. That's okay!
Unity CAN handle non-square textures and non-power-of-two
textures. We're taking advantage of the
non-square textures, though we are still using square frames. So, if I had more than 9 frames, I’d use 16
squares. Despite having fewer frames, you
still want to keep powers-of-two for compression purposes.
Texture Sizes; Ideally texture
sizes should be powers of two on the sides. These sizes are as follows: 2, 4,
8, 16, 32, 64, 128, 256, 512, 1024, 2048 etc. pixels. The textures do not have
to be square, i.e. width can be different from height. Note that each platform
may impose maximum texture sizes.
http://docs.unity3d.com/Documentation/Manual/Textures.html
Now, replace your texture in Maya with the new multi-frame
texture.


You'll notice that the texture is automatically squashed
into a square shape. Not to worry! We just need to adjust the tiling in Maya.


The ratio needed will change based on how many frames you have. Use the formula:
texture_ratio
= 1/frames
1 = 1
2 = .5
4 = .25
8 = .125
16 = .0625 (Maya may not correctly display this due to number rounding, but Unity will)
2 = .5
4 = .25
8 = .125
16 = .0625 (Maya may not correctly display this due to number rounding, but Unity will)
If you did it properly, you should see the original face
alone on the character. However, now you
can change it by increasing the offset in multiples of your texture ratio.


Before we leave this section, name your place2dTexture nodes
to something unique and easy to read, as we'll need to access these in the next
section.


And also, you can now bring your new textures back into Unity and test the offset by editing the material, just as you did in Maya. Later on, this will be controlled by a script.

VI. CONSTRUCTING THE TEXTURE DRIVER IN MAYA
Now here is the clever part.
We need functionality to offset textures in both Maya and Unity, but
Unity only really likes joint animation and throws out most of the other Maya
channels. Well, if it likes joint
animation, that's what we'll be using.
We need to set up some drivers in Maya first.
To begin, set up any sort of head joint system you want to
use, as we can connect our driver joints to that same system.


I used additional joints for extra controls. At the very least, you want a neck and a head
joint.
Set up your dummy joints for the eye and mouth. We'll be scaling these joints by single
digits to correspond with the indexes of each of the faces. Unity accepts joint scaling, and that's the
most reliable way to transfer values, as you almost never want to scale joints
anyways. Joints can take any scale from
0 to infinity, so given that they aren’t weighted to anything, they shouldn’t
affect anything.
The location of the joints themselves doesn't really matter;
I put mine in the eye and mouth spots for organization.


Create a controller for your expressions. This will have the attributes that will drive
the offset in Maya and scale the joints for Unity. Make a Nurbs circle, select it, then navigate
to Modify > Add Attribute...


Name your attributes, set the Data Type to int, and if you
like, set your Minimum, Maximum, and Default numbers. Start your numbering at 0.


If you mess something up, you can adjust your attributes in
Modify > Edit Attribute...
Now, onto the expressions; when the attribute is adjusted, we
want it to:
1.
Change the place2dTexture offset (at the same
ratio as in the repeatUV box)
2.
Scale the associated joint by the same value
Load the expression editor at
Window > Animation Editors > Expression Editor. Create a new expression with a unique name. In the Expression box, enter the following
information, replacing the 'user' values for your own names:
//Calculate the
offset and multiply it by the given value;
set the joint scale to the given value
userPlane_place2dTexture.offsetU = userControlCurve.userAttribute * userPlane_place2dTexture.repeatU
userJoint.scaleX = userControlCurve.userAttribute
userPlane_place2dTexture.offsetU = userControlCurve.userAttribute * userPlane_place2dTexture.repeatU
userJoint.scaleX = userControlCurve.userAttribute
What this will do is set the place2dTexture offset value to
your attribute, multiplied by your ratio (which happens to be shared with the
repeatU), and set your joint's scaleX to be the same as your attribute.
If you are using the same place2dTexture for your diffuse
and texture nodes, it will handle the offset for you. You can hook this up the hypershade. If you are using different place2dTexture, you’ll
need an extra expression to account for that as well.


Filter by expression name to see existing expressions.


Make a separate expression for each object, for organization
purposes.
If that worked, you should be able to change your attribute,
and immediately see your textures change; and if you click on the joints, you
can see the values have changed there as well.


You are also able to set keys on the controller object; just
make sure your curves are stepped, so it doesn't blend between multiple frames
when transitioning.
With the use of expressions, you can technically use
anything to control these values, including separate curve controllers or sliders. This will serve our purposes for
demonstration; this setup will let us easily animate it in Maya and see the results,
as well as drive the joints for it to be animated in Unity.
V. INTEGRATING INTO UNITY
Now it's time for the Unity portion.
Create an animation of the head movement, and make sure to
use your fancy new controls. Bake the
keys onto your joints by selecting all of the joints and navigating to Edit > Keys > Bake Simulation. This is important to bake the expressions we
made earlier to the joints.

Select your joints and Export Selection as an FBX, using the naming convention: model_name@animation_name.FBX. Make sure animation is checked.

Drag your new animation FBX into Unity. You can check out the animation by opening the
group, and clicking on your animation; the model is already set up in the
preview window, thanks to the @-notation we used.

Now we need to apply the animation to the avatar, to be able
to see it when we hit the play button.
Create a new Animation Controller by right-clicking the Project folder
and navigating to Create > Animation
Controller.

Double click your Animation Controller to open it, then,
drag in your animation. Right click 'Any
State' and make a transition leading to your animation. This will automatically play the animation
when the scene starts.


Return to your scene using the tab at the top of the viewport.

Click on your avatar, then drag the Animation Controller to the inspector.

The head is moving, but the facial features aren't
working! That's what we'll be addressing
next.


We need to write a script change the facial features, and
the joints we made in Maya will drive it.
Create a new C# script; right-click, Create
> C# Script. Name it AnimatedTextureOffset

Open your script and copy in the following text:
using UnityEngine;
using System.Collections;
public class AnimatedTextureOffset : MonoBehaviour {
public string jointName =
"ENTER_JOINT_NAME";
public int frameRate = 30;
private GameObject jointController;
private int jointScale;
private float offsetRatio = 1;
private float currentOffset =
0;
private float previousOffset =
0;
private float timer = 0;
void Start () { enabled =
FindAnimatedTexture(); }
void Update () { SetAnimatedTextureOffset();
}
bool FindAnimatedTexture(){
// Make sure a renderer
exists on this object
if(!renderer){
print
("Error in AnimatedTextureOffset: Could not find a renderer on this
object.");
return false;
}
// Determine offset
ratio by querying the main texture
Texture myTexture;
myTexture =
renderer.material.mainTexture;
offsetRatio =
(float)myTexture.height/(float)myTexture.width;
// Set the texture
scale for the element based on the found offset ratio
Vector2 size = new
Vector2 (offsetRatio, 1);
renderer.material.SetTextureScale ("_MainTex", size);
// Find the joint that
will be controlling the object,
// or alert the user if
it doesn't exist
if(!(jointController =
GameObject.Find(jointName))){
print ("Error
in AnimatedTextureOffset: Could not find" + jointName);
return false;
}
return true;
}
void
SetAnimatedTextureOffset(){
// This timer limits
the script to only update a limited amount of times per
// second, so it
doesn't catch interim blended frames between two keys
if(timer <= 0){
// Find the
controller object as specified (scaleX) and
// multiply by
the joint scale
jointScale =
(int) jointController.transform.localScale.x;
currentOffset =
jointScale*offsetRatio;
// If the offset
has changed, update the offset
if(currentOffset
!= previousOffset){
Vector2
offset = new Vector2 (currentOffset, 0);
renderer.material.SetTextureOffset
("_MainTex", offset);
previousOffset
= currentOffset;
}
timer =
(1/(float)frameRate);
}
else {
timer -=
Time.deltaTime;
}
}
}
When this
script is applied to an object in the scene, it will handle the animation
switching. It checks the texture, and
automatically does the math for us to find the ratio (if you properly set up
the texture in a single row with individual square frames). It will then adjust the offset in realtime,
based on the scaleX value of the object inputted into the 'Joint Name' variable
box.
To get it working, drag that script onto each of your
objects to be animated.


And change the value of the 'Joint Name' box to the name of
the joint that will be controlling the animation. Make sure this name is unique!
If you used an FPS other than 30, you can change it here as
well. This is important as it stops
Unity from updating the animation while it's blending between two keys; even
though we baked animation while using stepped curves, Unity still tries to fill
curves in between keys. See the
Afterword for more information about this.


Now press the play button at the top of the viewport. You should see the character's face fully animated!


ADDITIONAL NOTES
AFTERWORD
This method of work can be easily expanded and altered. The most complex part of the project was
writing the script. Setting everything
up in Maya and Unity is actually fairly simple, but I wanted to break it down
in common terms so everything was clear.
This is especially useful, considering the offset/tiling material functionality
in Maya being near identical to the functionality in Unity. And really, the expressions, joint-drivers,
and the script are the interesting bit.
Contrary to what I say in the breakdown, it should still work with non-power-of-two meshes, as long as the single-row-square-columns convention is kept. I tried to make the script as robust as possible, with as little input needed from the user as possible, and this was part of my solution. It could easily be adapted to function with tiles or non-square frames, but that would require additional input from the user. Check the additional resources for links on how this could be built.
The biggest flaw with the method outlined here, is the way the offset updates; because Unity automatically fills the gaps between keys with splines, going between two keys will have an infinite number of interim keys. Going from 1 to 2 is, of course, not a big problem, because the numbers will round to 1 or 2, albeit they round not quite where the keys lie. But if you go from 1 to 3, at some point, the keys will come awfully close to 2. If I let it update constantly, the script will blend every frame in between the two keys on its way to the opposite key. Going from 0 to 7 really shows this, because it blends through every single key.
My solution to this issue was to limit the updates to a framerate set by the user. This works out, and even if it gets out of sync, the problems are still minimal. That's why it allows the user to change the FPS as well. Because I don't query the animation played, I can't get that information from the animation, nor do I want to; by prompting the user, they have the option of entering any framerate other than the actual framerate, such as 15 or 10, instead of 30, which could potentially further fix any sort of skipping problems should they arise. If you were to set the framerate to a very high number, you can see how it updates faster than it should, and the reasoning behind this variable.
Another (non-working) solution I had tried was to set a threshold at which the script would update (essentially hitting a whole number in the scaleX), but this didn't work out, since even differences between keys still occasionally landed whole numbers. Of course, you could animate the offset all in Unity, but the point of the project was to do it in Maya and Unity together.
Happy animating!
ADDITIONAL RESOURCES
Animated
tiling textures. I used these concepts
as a jumping-off point.
http://wiki.unity3d.com/index.php?title=Animating_Tiled_texture
http://wiki.unity3d.com/index.php?title=Animating_Tiled_texture_-_Extended
http://wiki.unity3d.com/index.php?title=Animating_Tiled_texture
http://wiki.unity3d.com/index.php?title=Animating_Tiled_texture_-_Extended
General Unity shader and material
reference
http://docs.unity3d.com/Documentation/Manual/Textures.html
http://docs.unity3d.com/Documentation/Manual/HOWTO-alphamaps.html
http://docs.unity3d.com/Documentation/Components/shader-TransparentFamily.html
http://docs.unity3d.com/Documentation/Manual/Textures.html
http://docs.unity3d.com/Documentation/Manual/HOWTO-alphamaps.html
http://docs.unity3d.com/Documentation/Components/shader-TransparentFamily.html
Steps to get animation working
in Unity
http://docs.unity3d.com/Documentation/Manual/MecanimAnimationSystem.html
http://docs.unity3d.com/Documentation/Manual/Animator.html
http://docs.unity3d.com/Documentation/Manual/MecanimAnimationSystem.html
http://docs.unity3d.com/Documentation/Manual/Animator.html
Remember, when it comes to
using a new scripting language or engine, Google is your friend…
http://www.google.com
http://www.google.com
…and to our advantage, Unity
is very well documented.
http://answers.unity3d.com
http://docs.unity3d.com
http://docs.unity3d.com/Documentation/ScriptReference/index.html
http://answers.unity3d.com
http://docs.unity3d.com
http://docs.unity3d.com/Documentation/ScriptReference/index.html
I have tried it but i couldnt get it to work. I have done the attribute and the expression in maya and it is working properly. As long as i go to unity the spritesheet is not moving at all.
ReplyDeleteI am a bit confused as the document says about changing the "scale" of the bones, but i have seen on the script that we are changing the rotation of the bone. I have tried to change the expression from rotate to scale but still is not working.
The part that I bake the bones, I have done it in many ways, just selecting the main bone, just selecting the bone conected to the sprite sheet, and selecting all of them (i think this is the right one). But I cannot see this working properly.
Any suggestions? Thank you so much
The script should in fact use the scale. My apologies; my variable names were named in a confusing way (jointRotation instead of jointScale) and I've fixed that above. (You could technically use either, but I chose scale for this project.)
ReplyDeleteAs for your problem, make sure your FBX coming out of Maya is getting the values correctly. If you select all of the bones and bake them, they should have the proper keys. When you load the FBX, make sure your joints are getting the proper scale values.
If it's coming out of Maya fine, then it may be a problem with the set-up in Unity or the script itself. The textures won't move automatically, so you need to set up all of the little bits that happen in second half of step 5; make sure your joints are named uniquely, make sure that name is entered in the Inpsector box, and that the script is attached as well.
If you're still running into problems, feel free to drop me an email, and I'd be happy to take a look at the files and see if I can help out that way.
I was just looking for this exact solution! Thank you so much!
ReplyDeleteI also would ask your permission to translate this material to Russian and publish the translation in russian IT blog habrahabr[dot]ru, all links to this original post as well as your authority preserved of course.
ReplyDeleteHello Jacob,
ReplyDeleteI'm hitting a wall when i try to drag and drop my animation icon into the Animation Controller in Unity. It just won't let me do it. The rig is set to Legacy and the scale of my model 1. Is there anything else I might have missed that's stopping Unity from letting me drop my animation into the controller?
Thank you
Kim
Hi Kim, sorry for the very late reply. If you're still running into issues, send me an email, and I'll try to take a look. The method I used here actually isn't the best, though it's a quick way to test to see if everything is working.
DeleteThanks Jacob - turns out that it only allows me to drag and drop animation icons when my rig is set to either 'Generic' or 'Humanoid'. It's working ok now. Thanks for sharing such a very helpful tut :)
DeleteKim
Certainly, I don't mind. I'm glad you found it helpful.
ReplyDeleteHey Jacob, this is a fantastic article and I'm hoping to get it to work for my game prototype at work. Wanting to do something very similar to this/Lego Movie w a simple shape and a multitude of facial expressions. My question is, what version of unity are you using? We unfortunately are stuck in 3.5 so not sure if there are any issues with that? Thanks, Brian.
ReplyDeleteHey Brian, thanks for the email. I used Unity 4.0 for this tutorial, and I'm not sure off of the top of my head if Unity 3.5 would work, but I would imagine so since it still uses C#. As for the scaling of the geo, I replied in the email, but in case anyone else runs into a similar issue: Make sure the meshes aren't skinned to the joints being scaled. You can actually leave the skinning off of them completely, since they're only used in Unity for copying those values.
DeleteHi Jacob, I follow your tutorial but it's not work. the console window in unity display " could not find (my joint name)". I try with others joints but it could find anything. Can you help me? Thanks.
ReplyDeleteHey Long Lee,
DeleteCheck to make sure your joint name is unique from the other joints, and I don't remember if it matters, but check to see if it's case sensitive. If neither of those work, send me an email and I'll take a look. In my updated script, I'm actually using a variable to find that specific object, rather than a string variable; using the object is a much better solution. I haven't had a chance to publish my new script yet, but I can help you implement that if there is still an issue.
I'm having an issue w the expressions actually scaling the geo, instead of just changing the UVs...what am I doing wrong?
ReplyDeleteHi Jacob, i like ur solution for this problem but my problem is slightly different.
ReplyDeletewat if i just wan to animate uv position in maya instead of unity. is it possible to do tat in maya?
im using maya 2013 and i cant figure out how to keyframe uv in maya.
Pls help.
Yeah, you can do that pretty easily in Maya. The third step (III. SETTING UP THE MULTI-FRAME TEXTURE) of the document goes over how to animate the texture space under the UVs, to give the impression that the UVs are changing. I'm not sure exactly what you're trying to do, but you could technically animate the UVs themselves using keys, though it's not exactly good practice to do so.
Deletei did try ur way but still cant really achieve how i expected. can u tell me specifically how to key frame uv position? cos after i select the uv i wan to animate and hit S key. nothing happen.
DeleteThis is exactly what I've been looking for!!!! Awesome!!!!
ReplyDeleteHey man, I am at a loss as to how you mirrored the eye UVs to share the same space. It's easy for me in other apps but Maya makes it tough. Care to share how you did it?
ReplyDeleteI just mirrored the geometry using Edit > Duplicate Special and setting the scale to -1. It should keep the UVs, it will just flip the geometry.
DeleteThank you! This is exactly what I was looking for, really helped me out! I just wish Unity didn't try to interpolate between stepped key values, causing headaches.... ;)
ReplyDeleteI'm glad it was helpful for you!
DeleteThis is pain to setup especially with the large volume of texture swaps and rigs i have to do... I don't understand why this is something that has to be so needlessly obtuse and complicated to get into unity
ReplyDelete