Getting up to speed took a little time and experimentation with the Unity 2D Demo project, as well as the videos released by Unity. I thought I might document it here for anyone who needs this information specifically. For reference, here are the two Unity 2D demo videos currently available:
http://www.youtube.com/watch?v=B1F6fi04qw8
http://www.youtube.com/watch?v=4qE8cuHI93c
You can find a lot more information about Unity 2D there, on top of the information covered in this tutorial.
Click 'Read More' below to see the full document.
Prep your sprite sheet for Unity. Split up the pieces where you want to animate them. I did the first following example as a test, and Ryoma did the second. Alpha matters.
Import your sprite sheet into Unity. Drag it into your Project folder.
Cut up your sprite using the new Sprite Manager. Select the sprite and look at the Inspector Window. If you set up your project as a 2D project, it will set most of your default options. Set Sprite Mode to Multiple, then click Sprite Editor.
This is where we cut up our sprite. You can draw a box around an object to create a new sprite object, or use the automatic method by selecting Slice in the top left corner. Automatic will try to slice all of your sprites based on your alpha; Grid will slice it based on given parameters (say, if you are using sprite effects that need to line up just-so.)
Make sure you name all of your sprites here, make sure they're trimmed if you made them manually, and set your pivots in this step.
Great. Now we need a place to store our sprites. Drag all of your sprites into your scene. Make a Empty GameObject (Ctrl+Shift+N), and dump the sprites into that group. Eventually, I'll be adding some effects sprites, but we can do that step later as needed.
Arrange your sprites and set up your hierarchy. You can group eyes and hair under a head group, for example. If you want fk-style arms or legs, you can also group them appropriately. This is where the pivots from the sprite manager really matter. Once you set this up, you want to leave it alone. If you move objects after you start animating, it will throw off all of your animations, which only use relative translation and rotation. Also, use Z-translate to fix draw order. Since 2D is with an ortho camera, you can use Z- to bring forward and Z+ to push back.
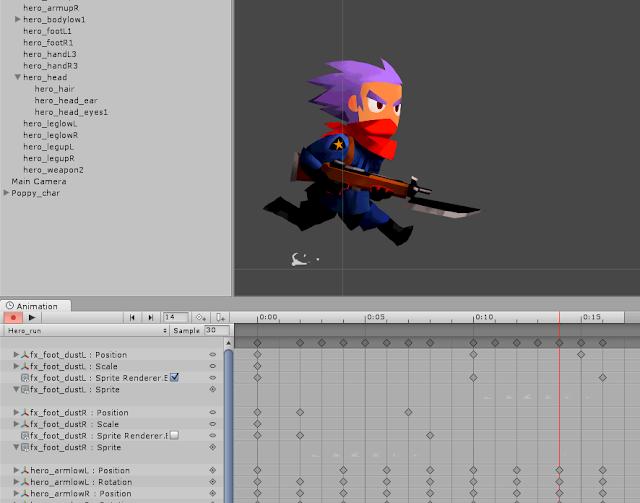
Open up the Animation window (Window > Animation, or Ctrl+6). With your group selected, create a new animation clip from the dropdown. This will automatically create, assign, and populate an animation controller for you; if you want the animation on a different or existing controller, you can edit all of that in the Mechanic Animator window (but that's a different tutorial).
With the record button on, start animating in the scene, it will auto-key and create curves for you (K will key manuall). The record button will automatically turn on, so make sure you turn it off if you want to make changes to the character setup.
Alternatively, manually create new keyable objects with the Add Curve button.
You can also create keyable curves, such as show and hide sprites (say, sprite fx) and you can cycle through sprite frames.
While animating, click Dope Sheet or Curves (hotkey C switches between them) at the bottom to switch between the views. Make sure the curves you want to edit are selected if you are working in curve view.
Finally, if you need to add in objects, say if you forgot an accessory, or want to bake in effects, you can just add them into your hierarchy. Make sure you turn rendering off by default, and you can turn them on in the animations that only need them.

If you move files or accidentally delete items, it will just turn red in the clip. Either replace it, check the path on the object, and make sure the name is right; or if you don't need it anymore delete the track from the animation.
Well, I hope that was helpful for getting up to speed. If you have any questions, feel free to message me or leave a comment below.


Thanks for the first clues about how to animate my game ;D
ReplyDeleteI'll try this out later ;)
Thanks a ton for posting this!! been looking for something like this and you made my day!
ReplyDeleteCheers,
Roger
I'm glad it was helpful. Best of luck. :)
DeleteThank you!!
ReplyDeleteYou're welcome!
Deleteis the hero a free asset or your personal character?
ReplyDeleteThis is a character created specifically for this project. It's not really set up to be game ready, but if you'd like to work with the project files, I can send them to you.
Deletevery impressive i am also learn about this for 2D animation.
ReplyDeleteGreat tutorial! I learn a lot, thanks for sharing with us your wonderfull experience!!
ReplyDelete